The Science of Cartridge Brass Annealing
By Damon Cali
Posted on May 24, 2013 at 11:39 AM
Safety First: Annealing brass is potentially dangerous. This is not a how-to guide, but rather an explanation of the materials science involved. The goal of this piece is to educate you on the facts, not to teach you how to anneal brass. If you want to anneal brass, get help from a qualified, experienced individual. And be careful.
Any reloader who's been around the block for even a little while knows that brass does not last forever. Eventually it fails if it is fired enough times. One way it can fail is that the necks become brittle and split. One way to cure that problem is to anneal the necks every few firings. There is quite a bit of misinformation floating around regarding what annealing is, and how it should be done. The aim of this article is to shed a little light on the whats and whys of the science of cartridge brass annealing.
Basic Strength of Materials
Cartridge brass is what engineers and materials scientists would call a ductile metal. Like all materials, brass has certain mechanical properties like strength and elasticity. We can test materials to determine the values of those properties and to see how materials behave under different circumstances.
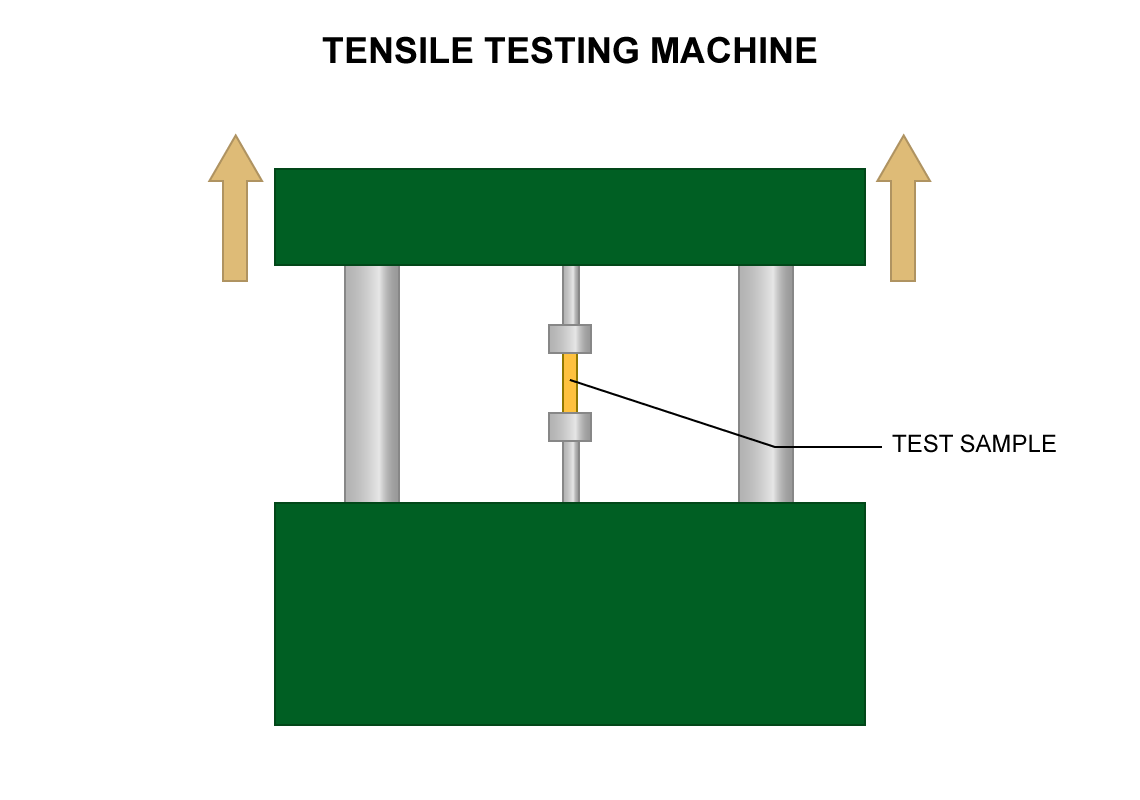
Suppose you have a bar of metal (like brass) and you clamp it tightly in a huge press and pull on it with great force, all the while measuring how much the bar stretches and how much force is being applied. This is actually how the material properties of metals is measured in practice. It's a simple process - you make a small bar of the material to be tested and clamp it into a large hydraulic testing machine (not unlike a giant reloading press). As you pull up on the sample, you continually measure the elongation and the force applied until the sample breaks. You can plot the resulting data on a chart where force is on one axis and elongation on the other. It's a simple chart, but it contains a wealth of information.
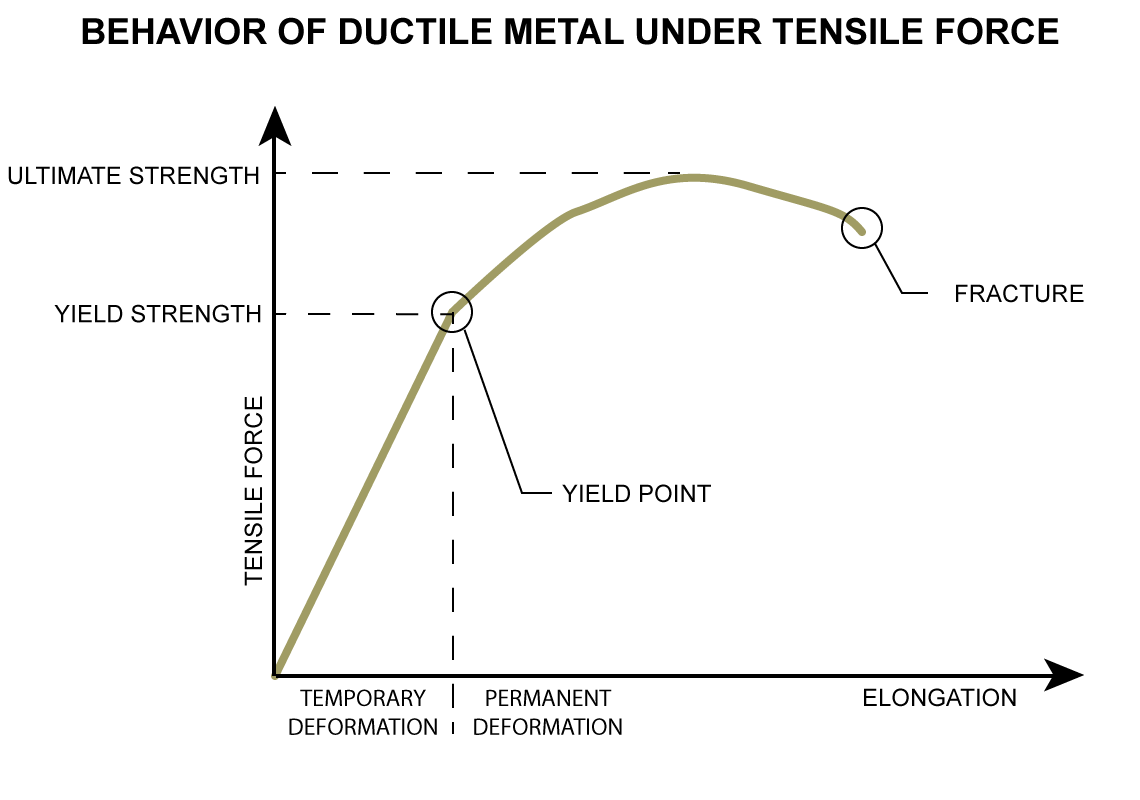
You will wind up with a chart like the one above. At first, the bar stretches linearly with the force applied - for every x pounds of force that you apply, you get y inches of stretch. If you were to stop pulling somewhere in this linear region, the bar would immediately snap back to its original size, unharmed. This is called elastic deformation. Elastic deformation does not permanently alter the material.
But if you keep pulling, you will hit a point where the line noses over. This is called the yield point, and indicates the point at which the material will no longer return to its original shape. If you let go past this point, the bar will snap back a little (the elastic portion of the deformation remains reversible), but there will be some permanent (known as plastic) deformation remaining. The force that is required to reach the plastic region determines the yield strength, and is usually expressed in units of pounds per square inch. This is not the same as chamber pressure, but rather a way of saying "a bar with a cross section equal to one square inch will yield when this many pounds of force are applied". So it is not in any way correct to say that a material with a yield strength of 80,000 psi will be able to withstand a chamber pressure of 50,000 psi. They are apples and oranges, despite having the same units of measurement.
Note that in engineering terms the word "hardness" is an equivalent concept to yield strength. You cannot have a hard material with a low yield strength, because hardness is yield strength. This is important and often misunderstood.
As you continue to stretch the bar past its yield point it will continue to resist stretching until you hit a point where the bar necks down locally into an hourglass shape - this occurs at the highest point on the curve. The bar will continue to stretch after this point, but it take less force since the cross sectional area of the sample has been reduced. Eventually, the bar will fracture and break into two pieces. The maximum force you can apply without breaking the bar is the ultimate strength of the material, and is also expressed in pounds per square inch. If you pull with more than that, the bar will fracture.
So what does this have to do with annealing brass?
Work Hardening
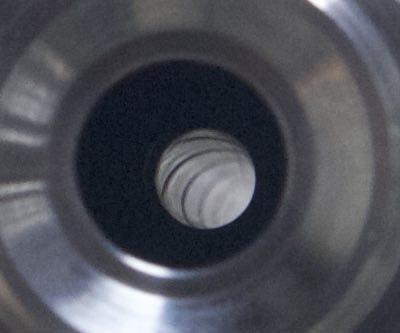
When a cartridge is fired, the thin case neck is exposed to very high pressures. Easily enough to cause the case to expand beyond its ultimate limit and fracture. But the chamber prevents that from happening by limiting the amount of expansion that can occur. In other words, the neck expands until it hits the chamber wall. At that point, there is no more space to expand into. This keeps the case neck from failing. When the pressure drops, the case springs back. But even though the case is protected from ultimate failure by the chamber wall, the brass is still exposed to very high forces, and will undergo slight plastic deformation - you can't have that much pressure in the case without moving a little metal. When brass is allowed to plastically deform, it work hardens. The more you "work" it, the more it hardens. Remember, hardness means yield strength. Each time you fire a case, it work hardens a little more, and gets a little stronger. But that isn't the whole story.
At a microscopic level, brass is made up of little crystals of metal known as grains. Don't try to look for them - you can't see them without special equipment. When brass is deformed, those grains shrink, which makes it harder for the molecules to slip past each other, increasing thee strength of the material.
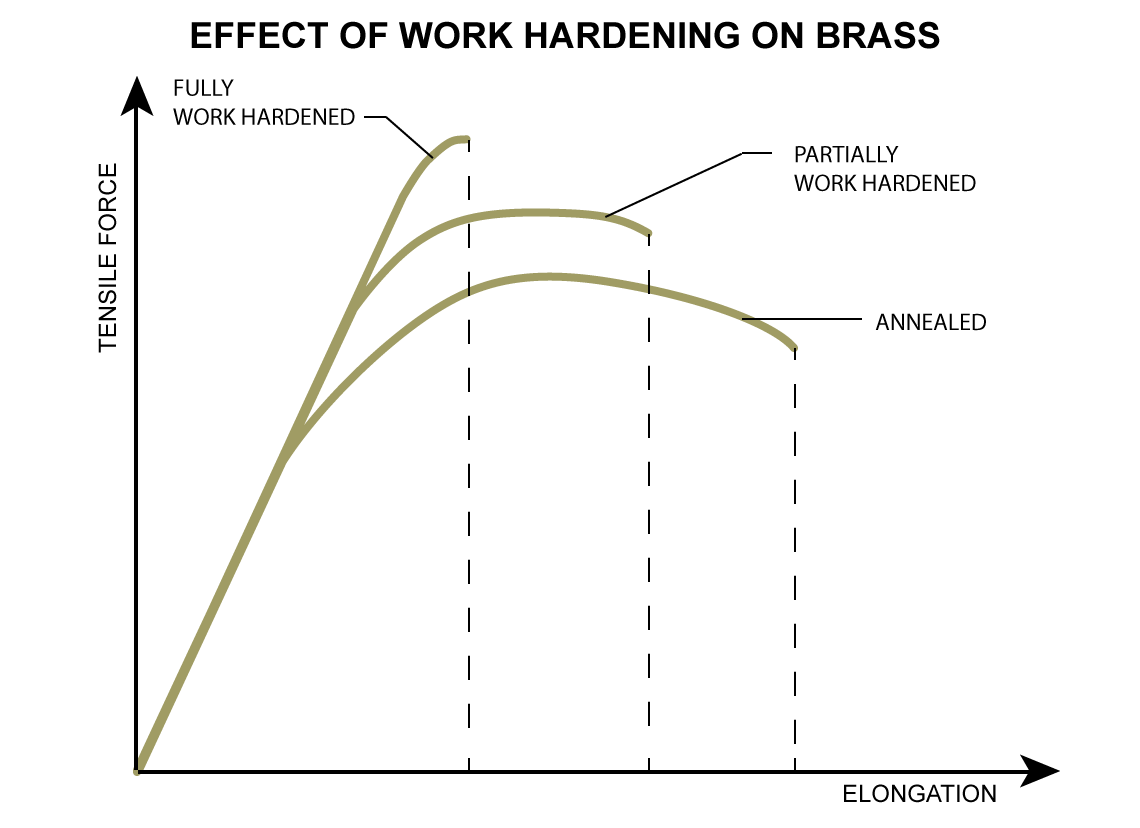
In the above chart there are three separate curves for brass in three states of work hardening. In the annealed state, the strength is at its lowest, but it has a high ductility - the metal will stretch a long way before it breaks. As the material work hardens, the strength of the brass goes up (the yield strength more so than the ultimate strength). But notice that the ductility has gone down. The now stronger brass will not stretch as far before breaking. It also turns out it takes less energy to break it. Finally, a fully work hardened material has lost virtually all of its ability to deform plastically. The yield strength is almost equal to the ultimate strength, and the ductility has decreased even further. The metal has become brittle.
If you work harden a brass enough, you will make it so hard and brittle that it will no longer be able to stretch enough to reach the support of the chamber without reaching its failure point. The result is split necks. The reason benchrest shooters get so many firings out of a case is because they often run chambers with very little clearance between the neck and the chamber wall. When diametrical neck clearances are .001", there isn't much room for work hardening to take place, and case life goes way up. (At a cost though - running necks that tight is an advanced technique and if done improperly will result in dangerous overpressure situations and other Bad Things.)
If you're wondering why this happens even though the strength of the brass goes up, it's because the brass necks are so thin. There just isn't enough material there for even the hardest brass to resist the chamber pressure.
Annealing Brass
The good news is that the work hardening of cartridge brass is reversible. If heat is applied to a work hardened area of brass, the energy of that heat will cause the grain size of the metal to grow. As this happens, the material loses strength (it gets softer) and regains its tolerance for stretching without breaking. It's a fully reversible process.
Exactly how much and when this happens depends on the material, the temperature applied, and the time that temperature has to act on the metal. For cartridge brass, the transformation is rapid, robust, and occurs at approximately 650-700 degrees Fahrenheit. If you apply a higher temperature, the brass will get even softer, but not dramatically so.
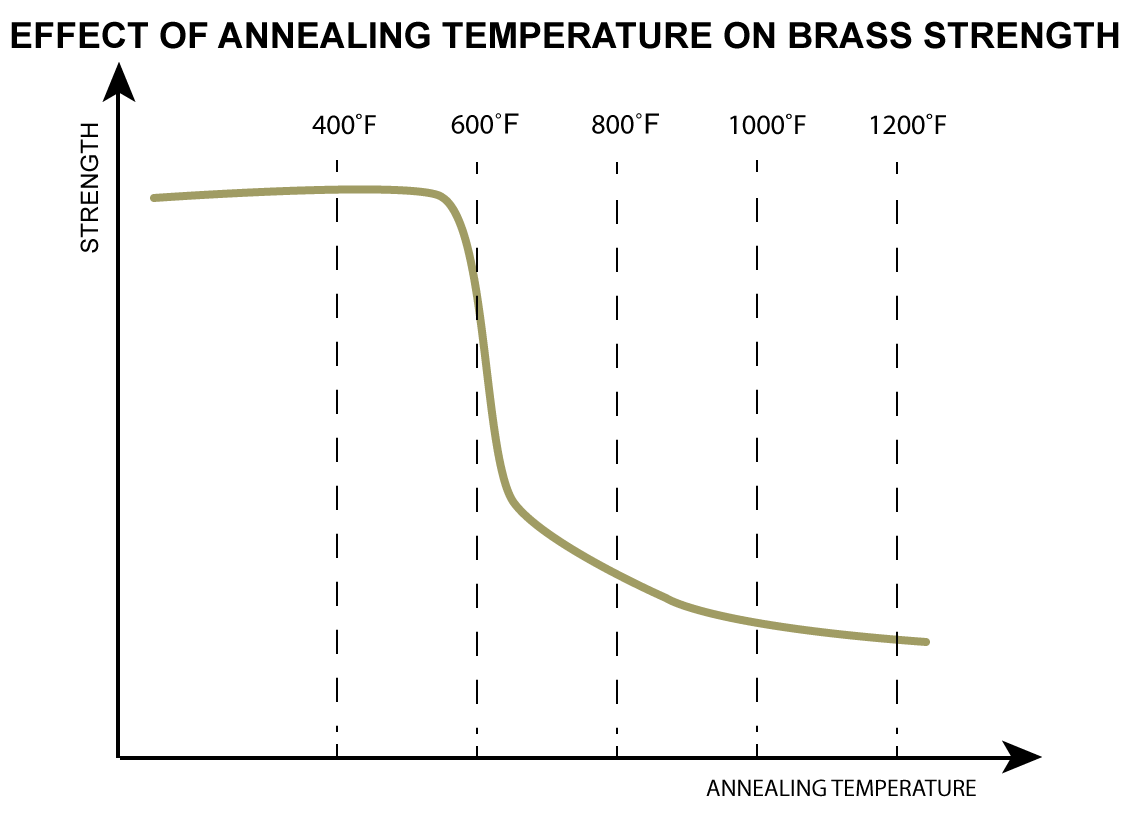
It's important to note that the above chart uses data for a 1 hour annealing time because it was all I had available. Temperatures required to anneal more quickly will be slightly higher. Unfortunately, data for short annealing times is hard to come by, so for the purposes of this discussion, we'll just use the 1 hour data. Just know that in reality, the critical temperature will be higher than the above chart shows.
So is it possible to over-anneal case necks? That's a difficult question to answer. Depends on what you mean by "over-annealed". If you consider fully annealed brass over-annealed, then yes, it's possible. I'd say likely, even, given how quickly brass changes under heat. If you believe this line of thought, then your aim is to catch the process half way down the curve in a "half-hard" state.
If, on the other hand, you don't consider fully-annealed brass to be ruined, it's not quite as touchy of an issue as various internet message boards might have you believe. You just heat the brass until the transition has occurred, and then you're done. Some factory brass has been known to come out of the box in a fully annealed state, although not all. Achieving a fully annealed state will be easier to do consistently than trying to anneal partially.
It is critical to understand that we are talking about annealing case necks only. The rest of the case is work hardened during manufacturing and left that way on purpose. It must be strong enough to contain the pressures of firing, and annealing any part of the case except the neck is potentially dangerous. Do not do it. Under no circumstances should you let the case body get anywhere near 700 degrees. If you do, the case is ruined, and should be crushed and discarded. You cannot anneal brass in an oven! You will ruin it. You must use another method, like a torch or possibly some sort of inductive heater that applies the heat locally to the neck area only. Some have suggested dipping case necks in molten lead (which melts very near 700 degrees depending on the alloy). This works in theory, but in practice, it's not such a hot idea. Spattering, sticky lead, and the fact that lead is a dangerous poison make this not such a good idea. Torches are by far the most commonly used heat sources for annealing. They're cheap, relatively easy to use, and do the job well.
How do you tell how hot the brass is? You can use a temperature indicator like Tempilaq. Tempilaq is a special sort of "paint" that is designed to melt at a very specific temperature. Get some and use it. Use some 450 degree Tempilaq on the case body to make sure it does not overheat, and use some 700 degree Tempilaq on the neck to make sure it reaches the required temperature. It's not perfect, but you will at least get a data point at 700 degrees. Once you get a feel for the temperatures involved, you'll likely find that the Tempilaq is not needed, but it's a good way to get your bearings.
So annealing brass in practice simply involves heating the neck of the case for a few seconds until it hits the required temperature. That's it. There are several machines on the market, including the popular Bench-Source model, that make that process easier and more consistent, but I have yet to try one. Recently, we've also seen some induction based machines come on the market, which is nice since they don't use flame.
To Quench or Not to Quench
Notice that there was no mention of quenching the brass. To anneal brass, all that is required is heat and time. Once you have allowed the structure of the brass to transform, it's done. You can cool it as slowly or as quickly as you like and it won't matter.
The myth that you need to quench brass comes from the requirement to do so when heat treating some kinds of steel. Those steels harden by a very different mechanism that has nothing to do with brass or work hardening at all.
Damon Cali is the creator of the Bison Ballistics website and a high power rifle shooter currently living in Nebraska.
The Bison Ballistics Email List
Sign up for occasional email updates.
Want to Support the Site?
If you enjoy the articles, downloads, and calculators on the Bison Ballistics website, you can help support it by using the links below when you shop for shooting gear. If you click one of these links before you buy, we get a small commission while you pay nothing extra. It's a simple way to show your support at no cost to you.